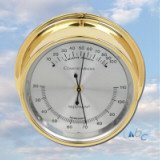
Comfortmeter Adjustment
Comfortmeter (thermometer/hygrometer) adjustment instructions are provided below. Please note these are general instructions, and may not work on all models and makes - use at your own risk.
Comfort Meters (Hygrometer/Thermometer) are a combination instrument, indicating both temperature and humidity. Calibration and positioning of hands are designed to indicate perfect comfort conditions in room atmosphere. Some models feature an indication on the dial, and when both hands cross in this area of the dial, the COMFORT zone is reached.
Other models, such as the Maximum Comforminder (pictured below right) have no such indication, but are very accurate.
Hygrometer Adjustment:
Put damp cloth on the back of the humidity indicator for 30 minutes (Note: you may need to remove the instrument if mounted on a wood plaque). The scale should then read approximately 95. If it reads a lower number or is off scale completely, merely insert a very small screw driver in one of the slots on the site of the movement housing closest to the Hygrometer coil and putting pressure on the mounting bracket. Pressure from one slot will pivot the bracket and increase the needle reading while from the other side will reduce the reading.
For movements that have a hole in the back of the movement housing, a screwdriver can be placed through that hole and into the slot on the top of the mounting bracket. Turn very slowly in the desired direction. Merely turn the screw on the back until the pointer is on 95. The humidity indicator will then start to operate again.
(To maintain accuracy of the instrument, it is advisable to repeat this procedure every six months.)
Thermometer Adjustment:
The dial type thermometer is of a very solid construction and will need adjustment only in exceptional cases. Should need occur, however, the indicator hand can be set to the correct reading by inserting a very small screwdriver in one of the slots on the side of the movement housing closest to the Thermometer coil and putting pressure on the mounting bracket. Pressure from one slot will pivot the bracket and increase the needle reading while from the other side will reduce the reading.
For movements that have a hole in the back of the movement housing, a screwdriver can be placed through that hold and into the slot on the top of the mounting bracket. Turn very slowly in the desired direction.
Visit us online at: http://bellclocks.com
a Division of Windward Instruments


0 Comments:
Post a Comment
<< Home